
Food from Northern Laos is distributing this cookbook online for free as a way of promoting their cultural diversity and cuisine. I know we have many Thip Khao lovers here that will enjoy this book. Enjoy!
-JAY
Food from Northern Laos is distributing this cookbook online for free as a way of promoting their cultural diversity and cuisine. I know we have many Thip Khao lovers here that will enjoy this book. Enjoy!
-JAY
Thai is one of our favorite cuisines, so we jumped at the chance to review Verve Culture’s Thai for Two Organic Curry Kits. The curry kits are imported from Thailand, gluten-free, and vegan, and come in Penang, green, and red varieties.
Included in each are the following organic packets: curry paste, curry seasonings, coconut milk, and dried herbs. You follow step-by-step directions, which include adding 7-10 ounces of uncooked protein and 7-10 ounces of uncooked vegetables. The recipes were well described and not difficult. You are told to use 50 to 100% of the curry paste packet depending on desired spice level, and that the dried herbs (kaffir lime leaves, chili peppers, etc.) are not meant to be consumed directly (since they just flavor the sauce).
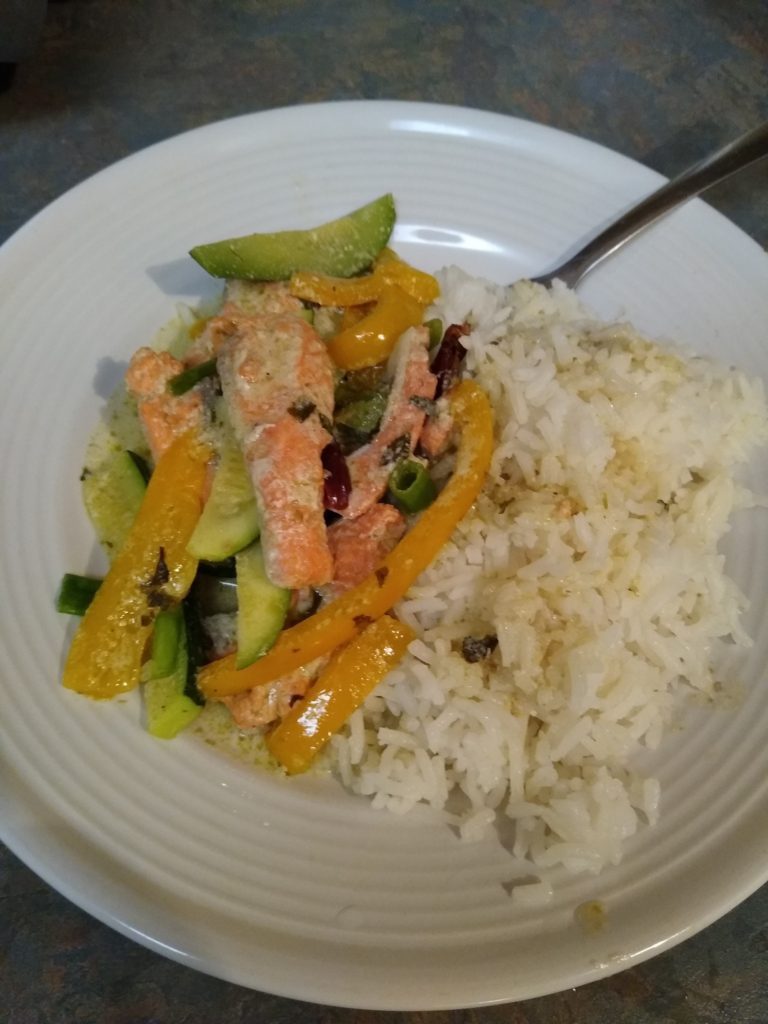
We made the green curry with wild salmon, a small zucchini, and a small orange bell pepper. The curry went extremely well with the wild salmon. We used 100% of the curry paste packet for this dish, which turned out to be around medium spice level (high for my dining partner).
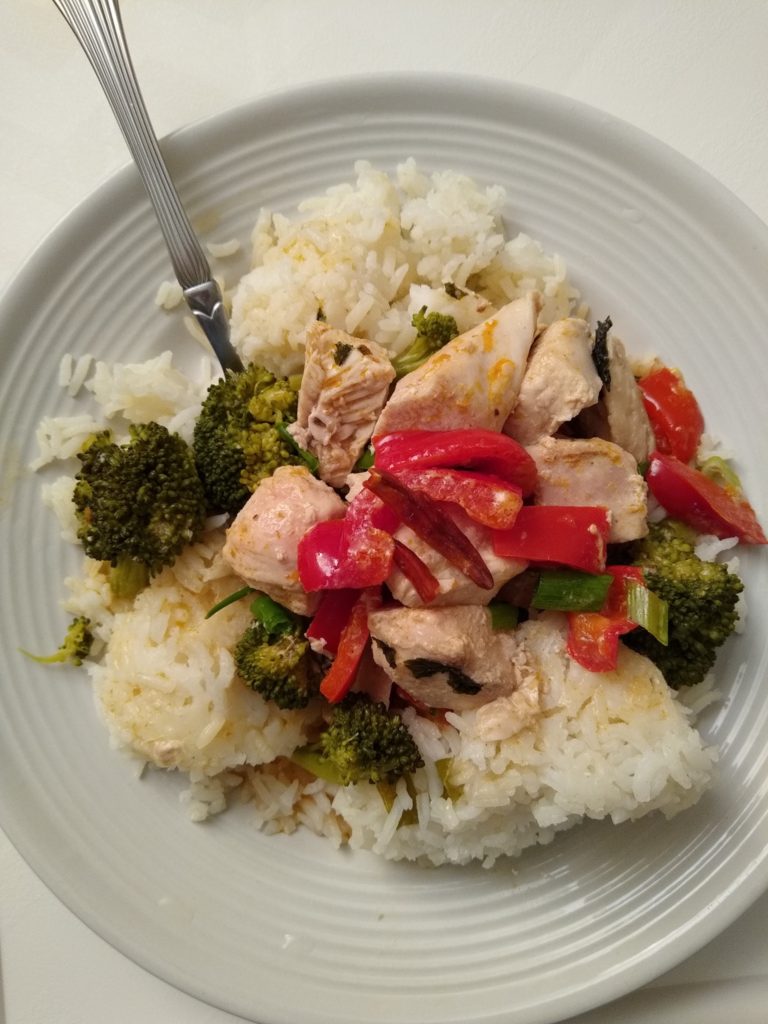
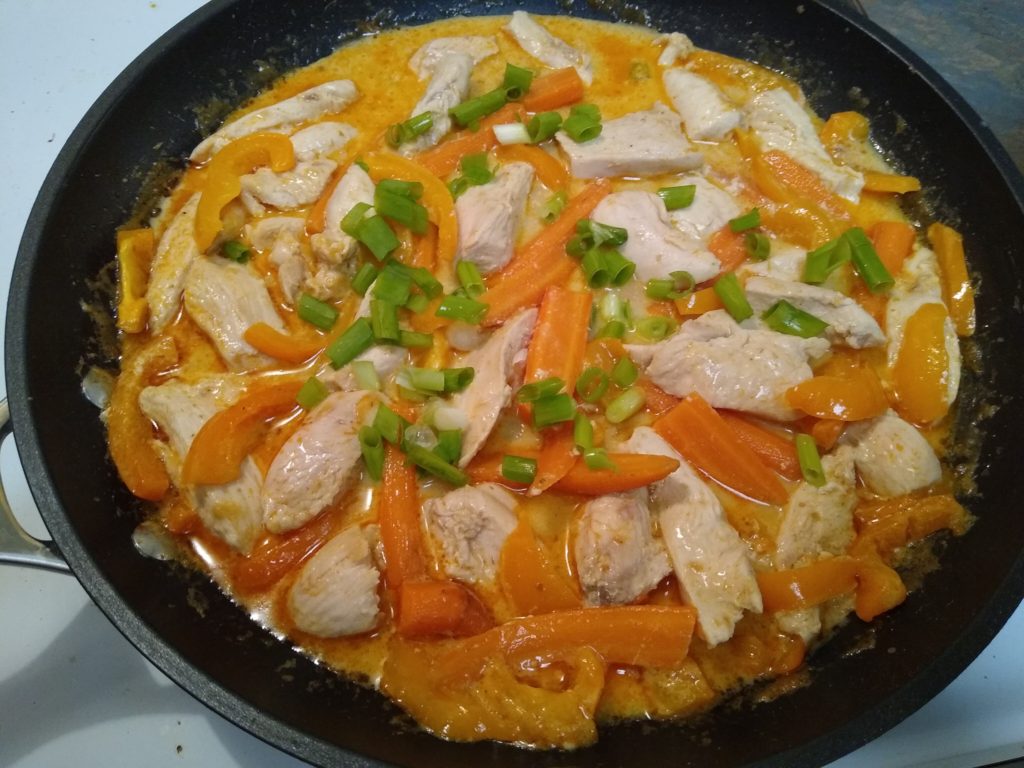
For the Penang, we went with organic chicken breast from the Lancaster Farm Fresh Co-op, an orange bell pepper, and fresh carrots. Visually, it contained orange vegetables with an orange sauce, so a different color bell pepper may have been a better idea. Scallions were added for a bit of color. 75% of the curry paste packet was used for this dish, which turned out to be around medium spice level (ok for me, but still a little high for my dining partner).
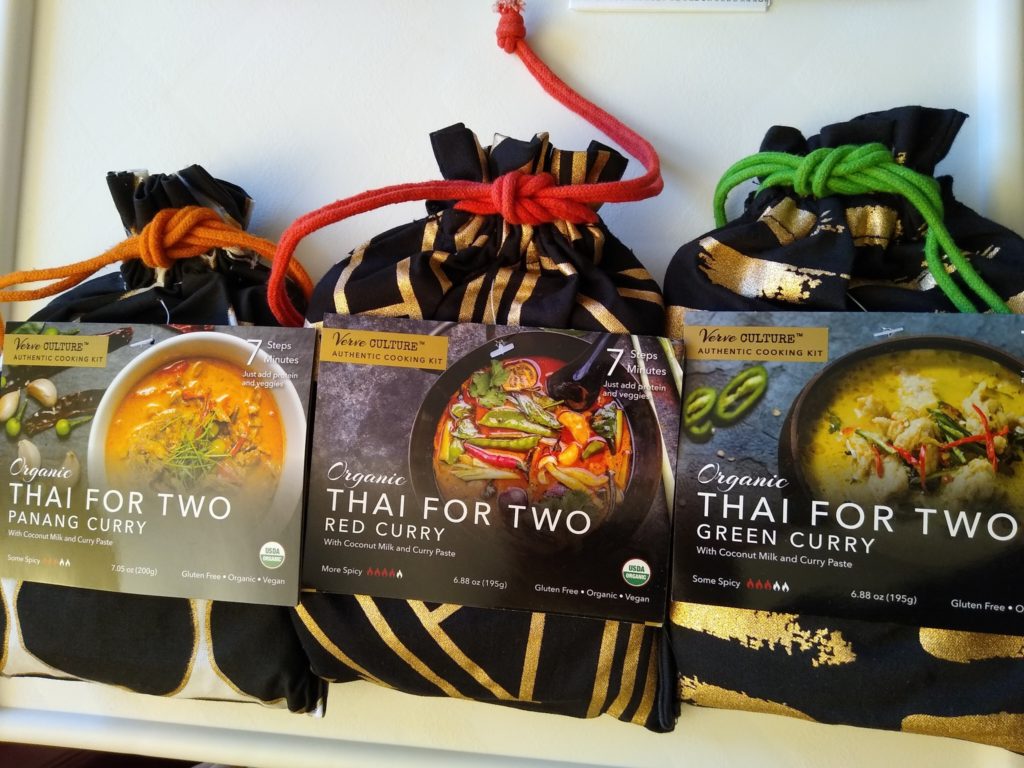
We used a small red bell pepper, and Lancaster Farm Fresh Co-op broccoli and chicken breast with the red curry kit. 50% of the curry paste packet was used for this dish, which turned out to be around medium spice level (about right for my dining partner).
We definitely enjoyed all three curry varieties, since the direct from Thailand ingredients give them an authentic flavor, but our favorite was the green curry (with wild salmon), even at the 100% spice level. The kits are good for two people, but we had some leftovers of the Pinang and red varieties since we used an extra 1/4 cup of water and a pound of chicken each.
Verve Culture makes two other Thai kits: Tom Kha Soup and Pad Thai. For a limited time, there is a coupon code for your holiday gift-giving needs. Order 5 flavors of Thai for Two Cooking Kits with the code THAI4TWO.
Lancaster Farm Fresh Co-op‘s CSA boxes can be picked up at various sites in the DC area, including the Mosaic District’s MOM’s Organic Market.
-JAY
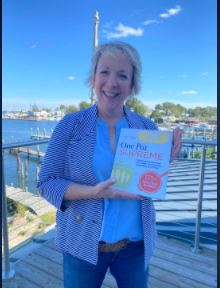
We’ve written about Gwyn Novak and her cooking school (No Thyme To Cook) in MD previously. We love her! Her new book is available for pre-order on Amazon NOW and officially launches on 10/27/20.
One lucky DCFUD reader will get a copy of the book mailed to them (US addresses only):
We will randomly choose one entry (out of the first 100) to receive a copy of her new book, One Pot Supreme. To be entered in the contest, email your first and last name to Contest (AT) dcfud (DOT) com with the subject line “Cookbook Contest” by Wednesday October 21st at 5pm. We’ll pass the winner’s email address to Gwyn’s marketing person (who will ask you for a US mailing address).
-JAY

“Score!” I thought when I discovered the last two frozen lumpia in the freezer today. They were tucked in a freezer bag behind a mostly empty bag of shell-on shrimp. Below that shelf, I found a bag of French cut string beans (the kind I use for lumpia). I must have bought an extra bag months ago while feeling ambitious, but then never made another batch of lumpia when the reality of rolling the Filipino spring rolls after work set in. “Oh hey, that pound of frozen raw wings I bought on sale for the Super Bowl before I remembered I don’t like football!”
What to do with only one fresh vegetable – a forgotten bell pepper – left and mostly bare stores? Go out? Heck no! We are solid proponents of staying at home and social distancing!
I used the frozen wings to make some stock. Once that was at a safe temperature, I removed the wings and added shrimp to the stock. I popped that shrimp out fairly quickly to keep it from getting rubbery and then I took out the shells. I marinated the wings in vinegar and soy sauce and then broiled them to finish them. (Is there anything sadder looking than boiled chicken?)

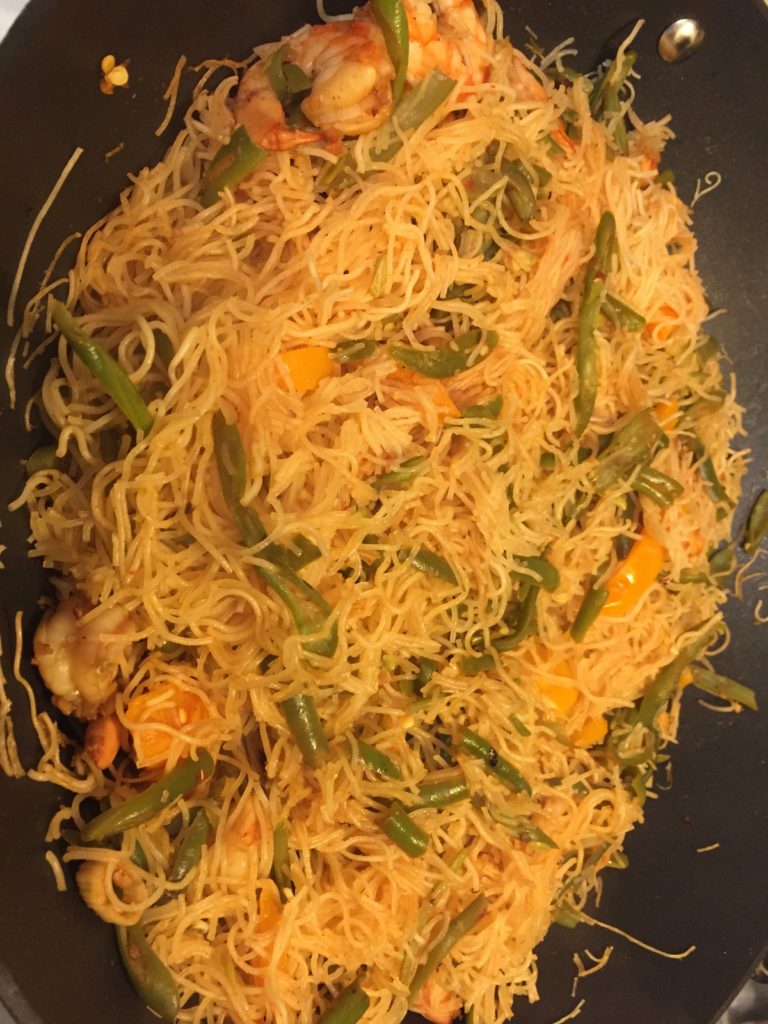
Meanwhile I fried up the lumpia and started sautéing garlic. My garlic was a little old, but whatever. I added the now cooked shrimp, various secret sauces (okay you got me…they are pictured above…and yes, I used bottled lemon juice. This is a comfort food (to me, anyway) emergency! I sautéed the thawed green beans, and pressed the water out the, and added the bell pepper and shrimp. When everything looked properly cooked, I removed all the vegetables and the shrimp from my wok.
After boiling some stock in the wok, I added some pancit noodles. Finally, I reassembled the shrimp, green beans, bell pepper, and pancit noodles and heated again.
Maybe not the best looking meal. Maybe not the best-conceived meal. But we didn’t leave the house. How about it, dcfüd? Show us some meals you made with all or no fresh items while we are mostly holed up at home hiding from Corona/Covid 19?
-CAF (Cindy)
 Thank you John Shields for bringing this wonderful event to our attention.
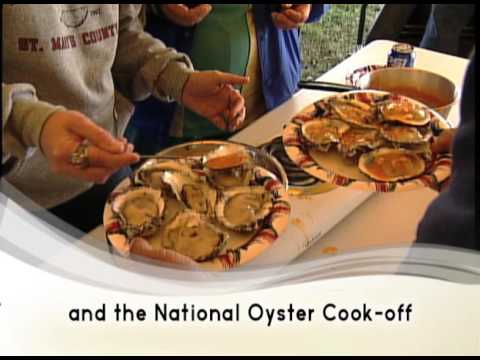
“This year the greater Chesapeake community will be celebrating the 53rd anniversary of the U.S. Oyster Festival, the home of the National Oyster Cook-Off and the National Oyster Shucking Competition. The festival is happening October 19 & 20, 2019 at the St. Mary’s County Fairgrounds in Leonardtown, Maryland. Both the Oyster Cook-Off and the National Oyster Shucking competition take place on Saturday, October 19.”
Contestants will be coming from all over the country, however, participants from the Baltimore/Washington region are under-represented. Whether a home cook or professional chef, enter your family recipes or creative new ones, and show the world that nobody can compete with the oyster cooks in our area! Submit your recipe(s) to the 40th Annual U.S. Oyster Festival’s National Oyster Cook Off!
Up to six recipes per contestant can be submitted, and the deadline is August 31, 2019. The three contest divisions are (1) Hors D’oeuvres, (2) Soups/Stews, and (3) Main Dishes. Here are the cook-off rules.
-JAY


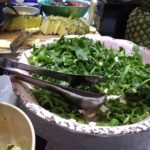
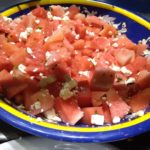
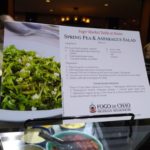

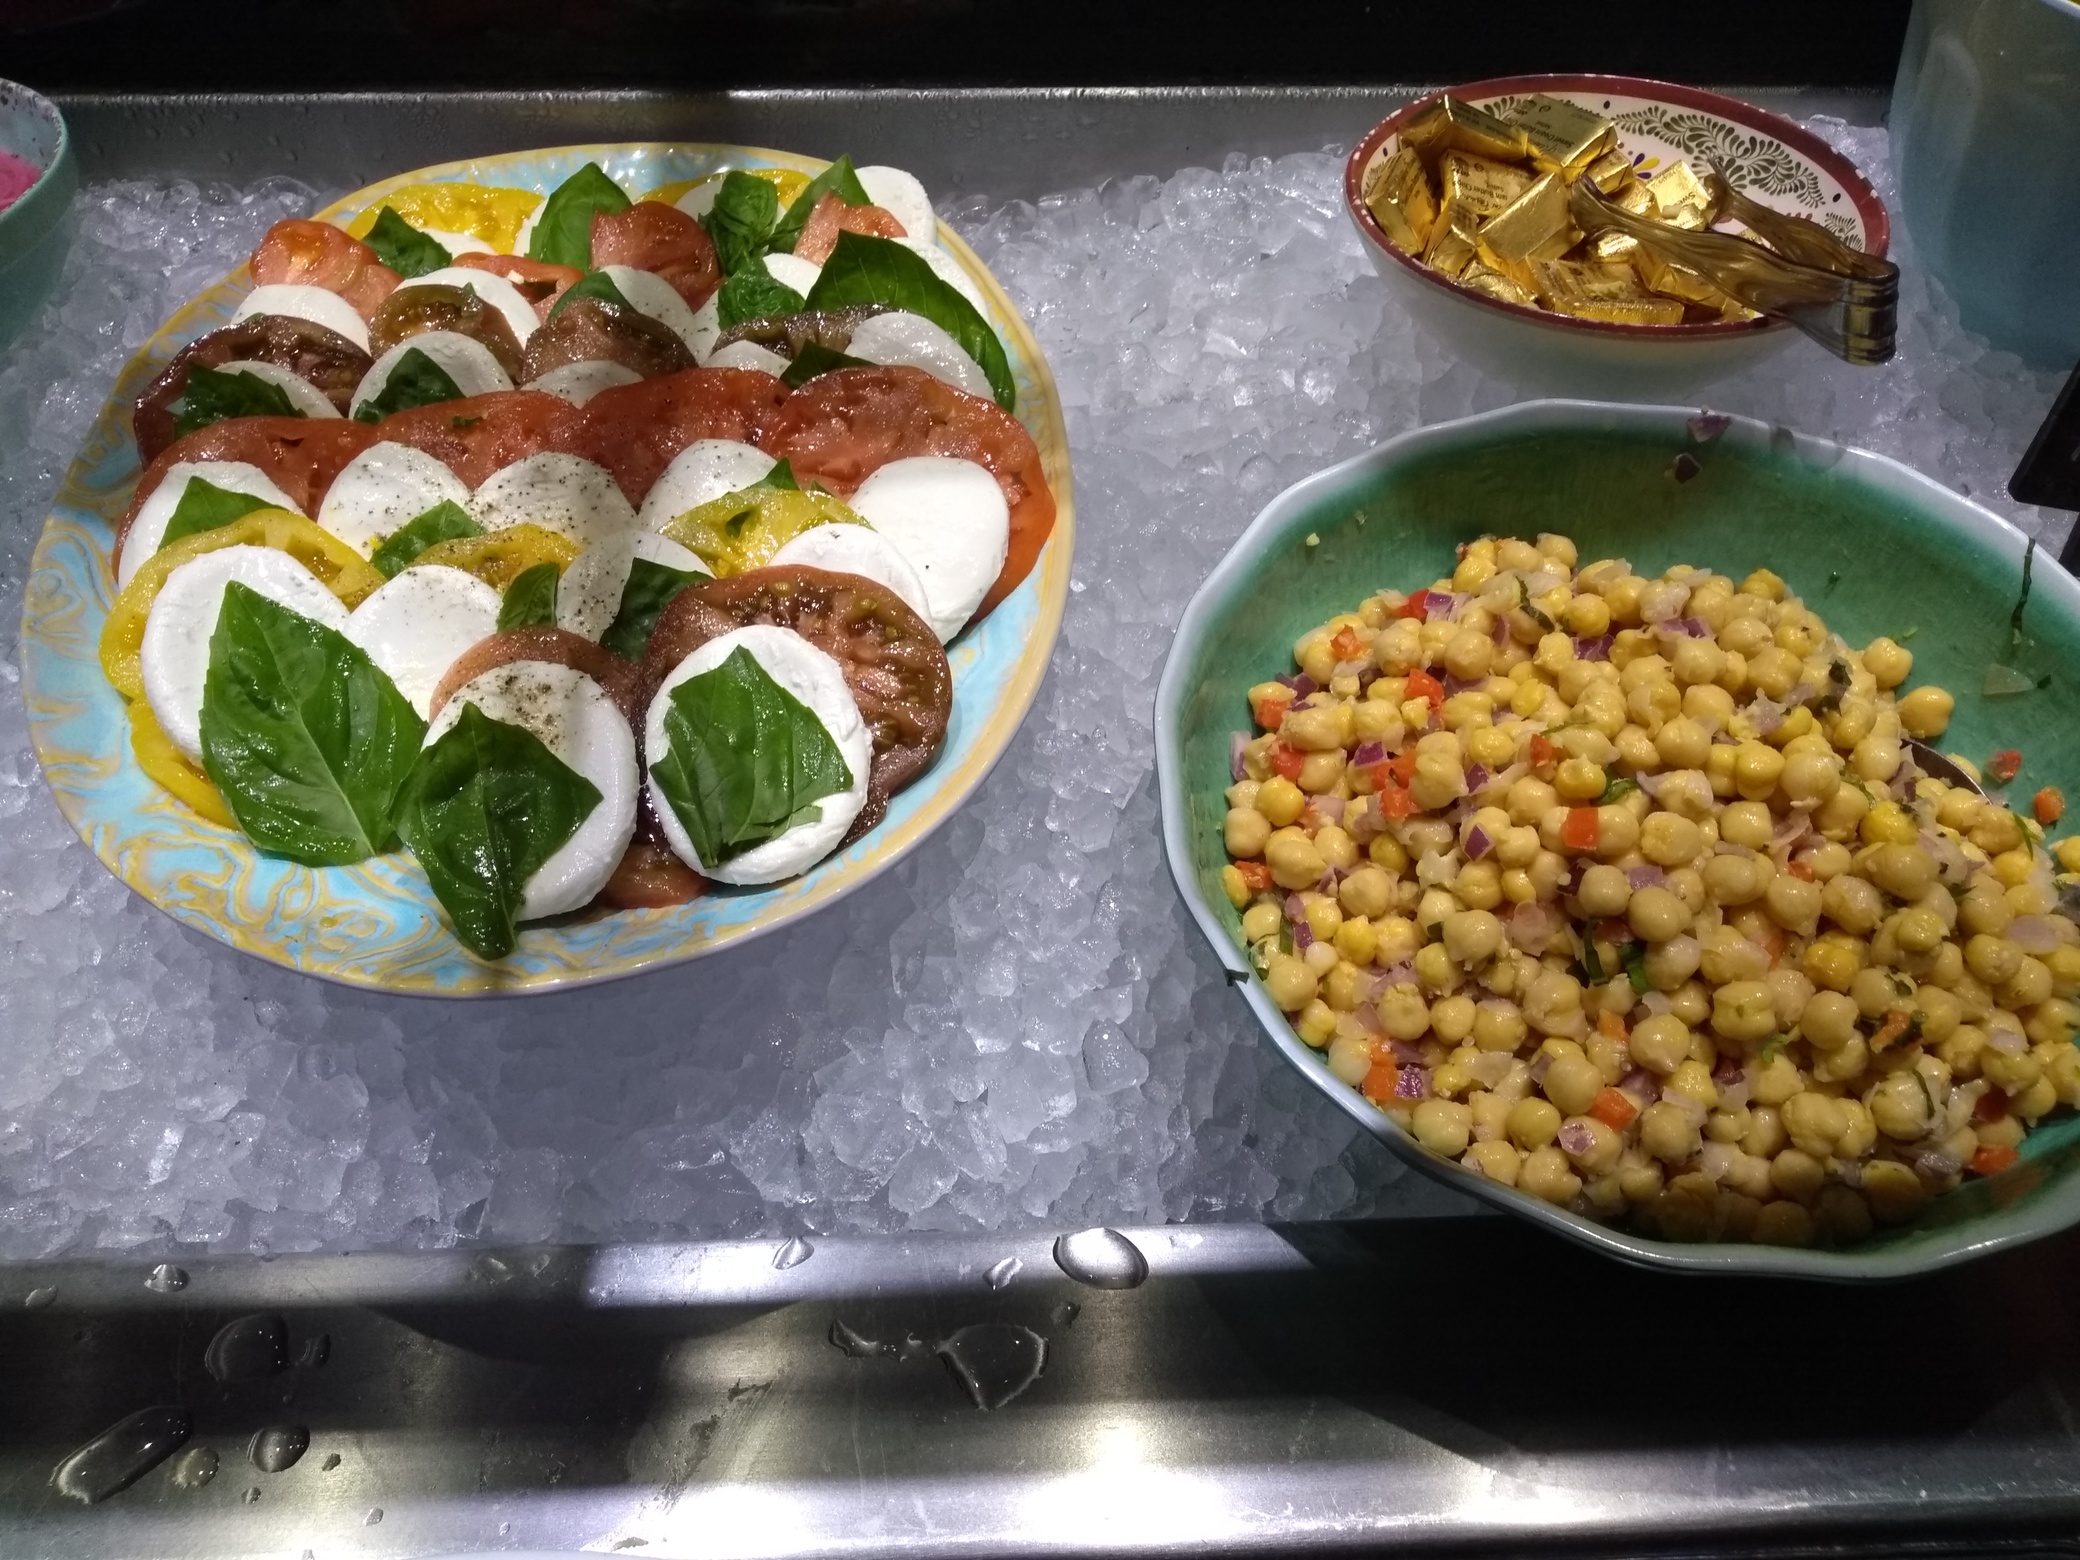 As always, Fogo de Chão’s seasonal dish additions are wonderful. It was nice of them to keep a couple of the Spring dishes when they made the Summer additions. We again recommend that they label the new additions, since some of them were not marked, and it would be nice to also somehow let people know that these are new seasonal dishes. Providing recipes for the current dishes (instead of or in addition to) last season’s dishes would be nice as well.
As always, we were happy to eat tons of picanha, beef and pork ribs, ribeye, and top and bottom sirloin.
Summer additions:
Heirloom Tomato & Mozzarella Salad
Chickpea Salad
Watermelon & Feta Salad
Watermelon Fresca (non-alcoholic mocktail)
-JAY
It was nasty out yesterday. I’d been up early and so had snuck out for breakfast and coffee before the rain started, but by early afternoon I was fairly well entrenched on my couch, alternately watching crappy TV and trying to care about a not-great book I’m probably not going to bother finishing. As dinnertime approached, I considered venturing out and finding some suitable ‘Saturday night’ activities (like not sitting on my couch), but a glance out my window at the cold rain made items I’d claimed to be “Interested” in on my events calendar decidedly less compelling than staying warm by my fireplace.
As yet another rerun of the cooking show I won’t admit publicly to watching claimed its latest celebrity victims, my mind wandered to dinner. What would I make? I clearly wasn’t leaving the house then, but I am leaving town in a few days, and the ‘fresh ingredients’ section of my pantry is of course a bit sparse, and what’s there needs to get used up. I pondered the most vulnerable assets: a bag of lovely, bright green okra; an only-just still OK lime; slightly more than a quarter of an onion; half of a stalk of lemongrass; the last few cloves of garlic. How do they fit? In the freezer: the last of a bag of shrimp.
As my mind meandered to Thailand, my eye grabbed a jar of extra hot Calabrese pepperoncino peppers. “Ithailian?” Sure, what the hell.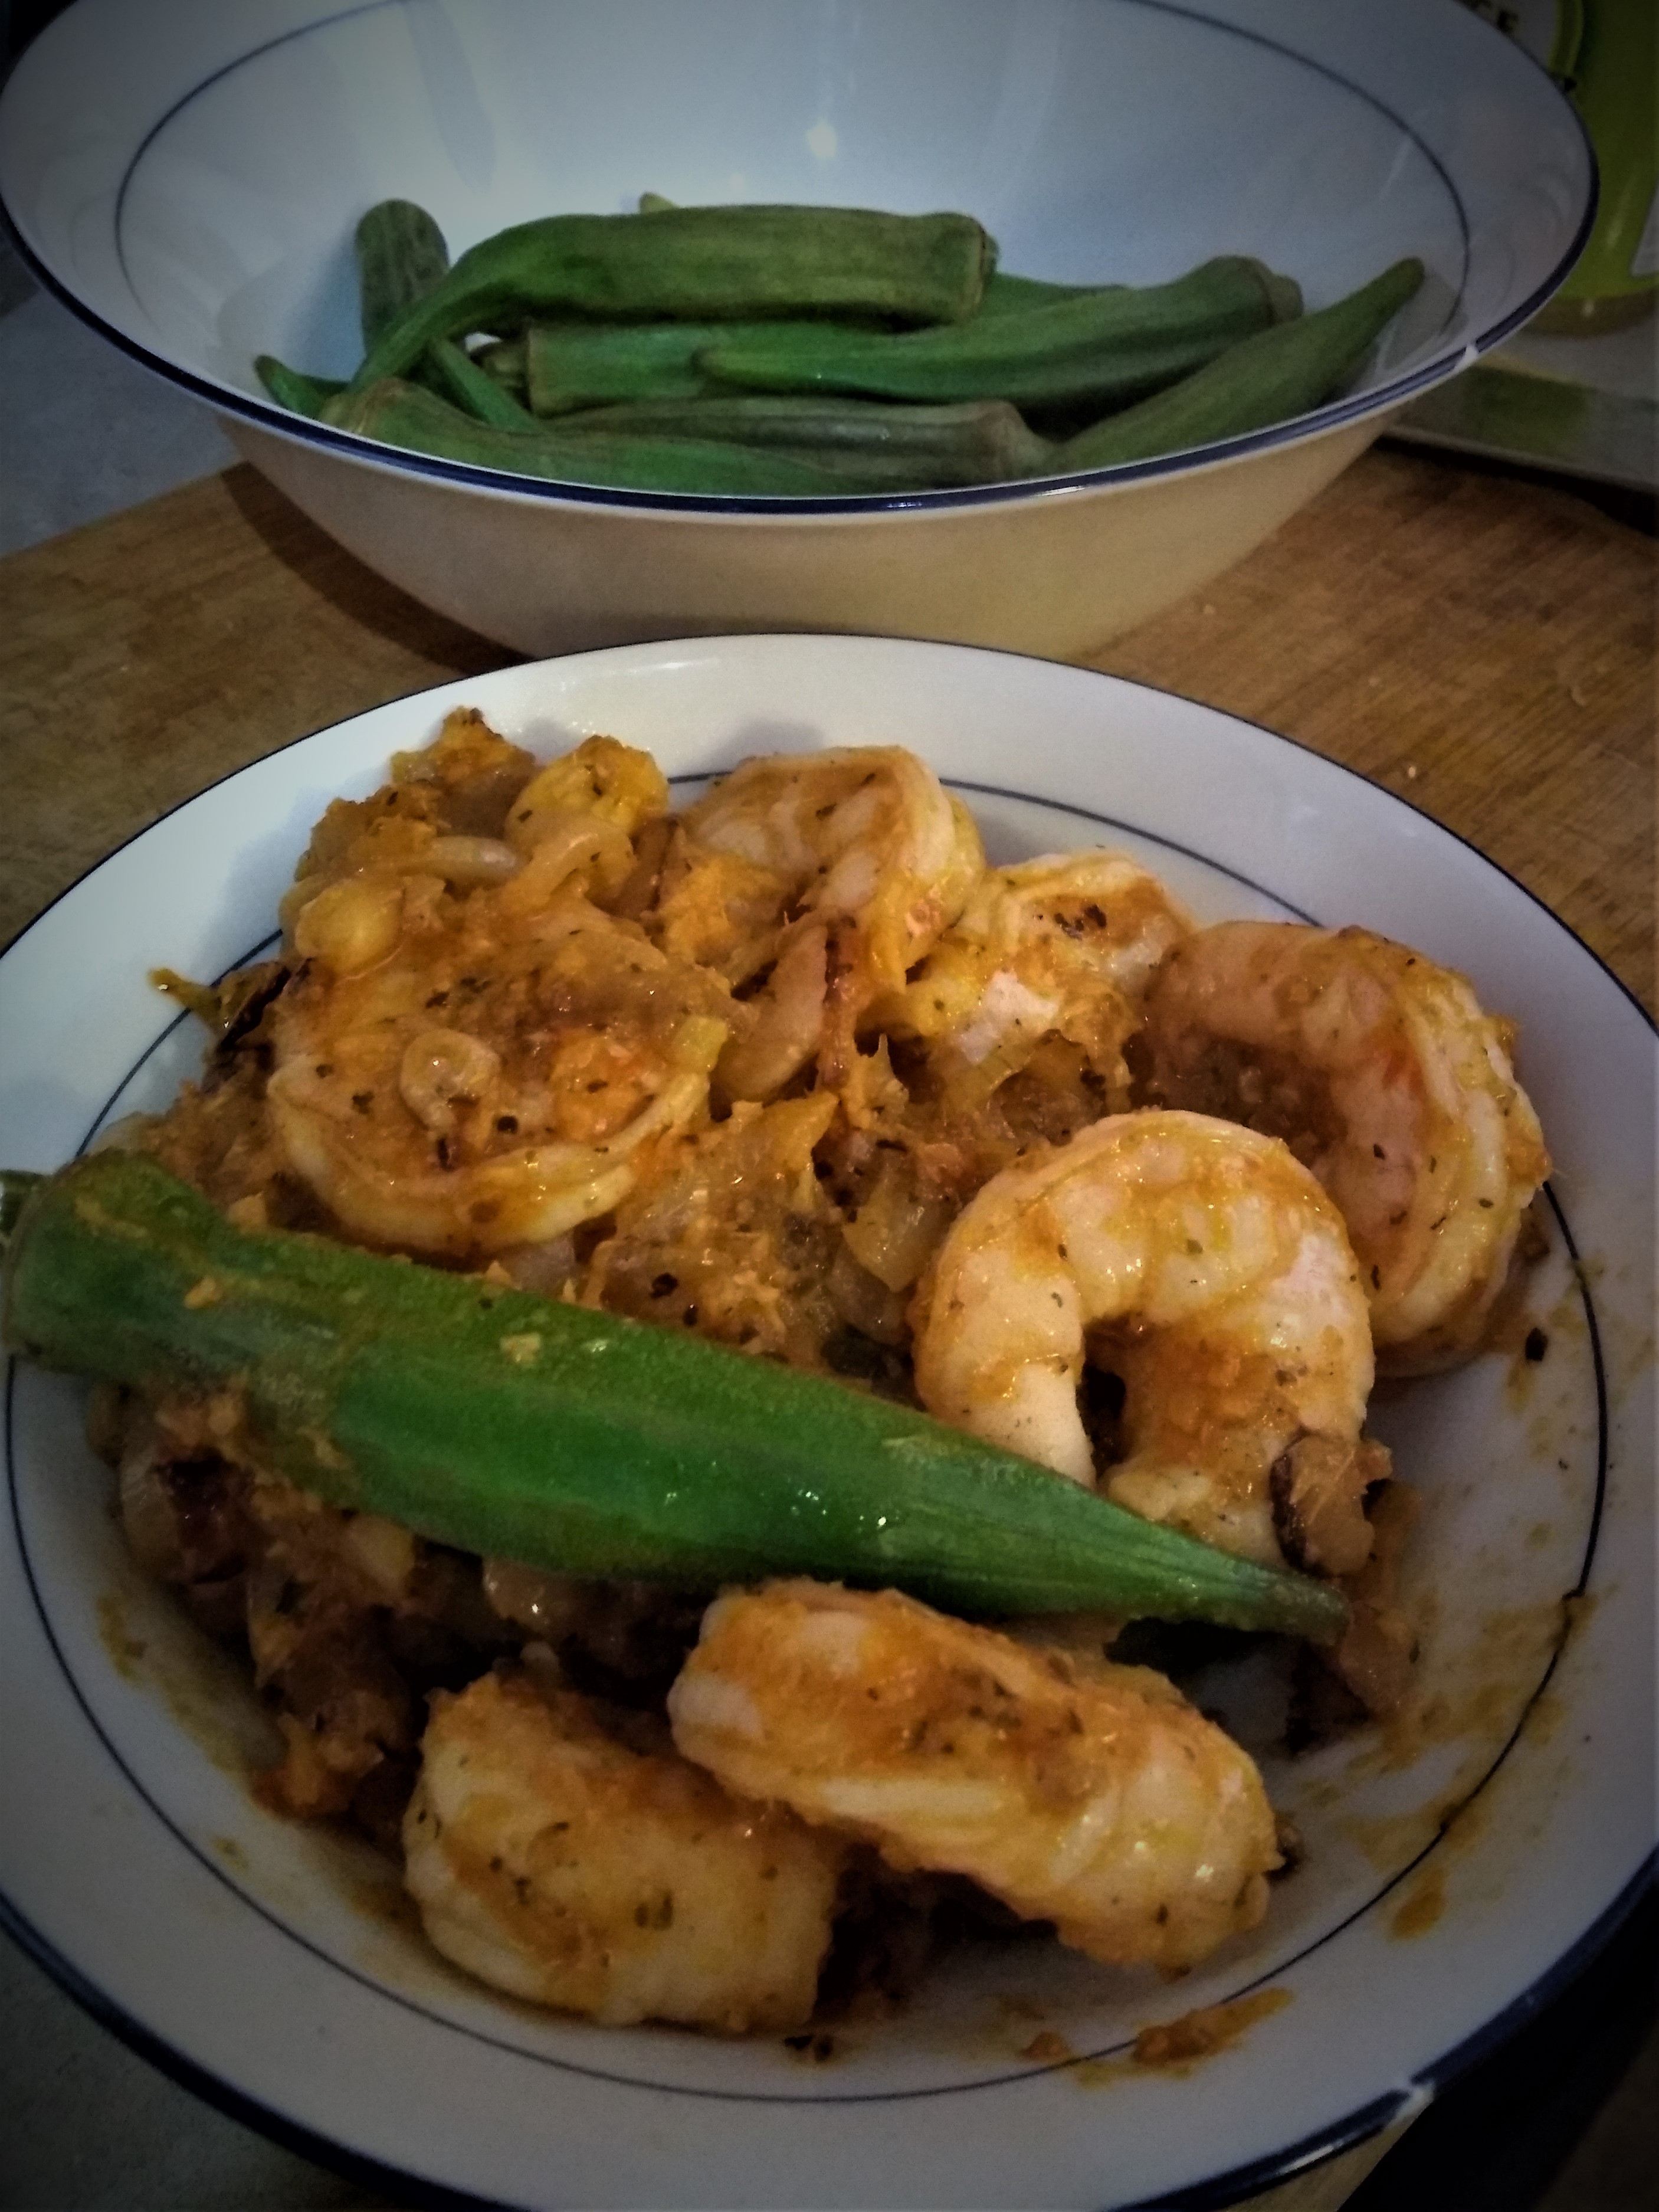
As the shrimp thawed (and I began warming myself with a nip of DC’s own Chacho Aguardiente), I sliced the onion and got it started caramelizing with a couple grinds of black pepper and shakes of dried basil. While that cooked, I assembled the mini-blender, and puréed:
Just as the onion started to brown (about eight minutes), I added about a tablespoon of olive oil to the pan, followed by the shrimp (six big ones), and stirred in my puréed sauce. Realizing at this point that it was going to cake like hell, I added about a quarter cup of (unseasoned) rice vinegar to loosen the sauce and integrate the elements. Cooking at this point only took a few minutes, as the vinegar cooked off.
What about that okra, you ask? Super simple: I washed them (there were maybe 16) and tossed them with 2 very finely diced and smashed cloves of garlic, and steamed them over a small wok of water, into which I also muddled the garlic ends and peels. The result was a fragrant edge to the okra – I’m actually surprised this worked, but hey.
I poured the shrimp and sauce over about half the okra (the rest is for lunch!), and it was really tasty. If I’d marinated the shrimp in the purée, it might have been even better, but for a 20-minute clean-your-cupboard dinner, I’m very happy.
– MAW


Fogo de Chão recently invited us to a media event featuring their new bar and seasonal offerings, and of course, a variety of fire roasted meats! While our schedule didn’t allow us to arrive early enough to try the Southern Brazilian steakhouse’s new Bar Fogo – Happy Hour Menu offerings, Braised Beef Rib Sliders, Brazilian Empanadas (beef), and Garlic Shrimp, or seasonal options, Blackberry Arugula Salad, Lentil Quinoa Salad, and Carrot Ginger Soup, we did sample the Mango Habanero Caipirinha off the new menu, and Fogo’s classic, Passion Fruit Caipirinha.
We did arrive in time to sample the Rodizio (parade of fire roasted meats), sides, and dessert. Some of our favorite meats of the evening were the Picanha (prime part of the top sirloin), Beef Ancho (ribeye), Costela (beef ribs), Pork Sausages, and Baby Lamb Chops. The Pão de Queijo (cheese bread) and Flan were hits as well.
“Bar Fogo’s Happy Hour is available Monday through Friday from 4:30 to 6:30 p.m. and features new Happy Hour prices that everyone can appreciate – from $4 Brazilian Bites & Beers to $6 South American Wines and $8 Brazilian Inspired Cocktails.”
This was our first time at Fogo, and we will definitely be returning soon. We definitely need to try the empanadas and both the new Strawberry Hibiscus Caipirinha and Fogo Caipirinha.
Fogo’s nearby locations include Washington, DC, and a new addition to the area, Tysons.
-JAY
Editor’s Note:
Several of the included links contain actual recipes.
I’ve been a bit obsessed with Mexico City recently following a trip in November. It’s pretty fantastic (if you can handle the smog and speak at least a bit of Spanish) – great art, great culture, amazing food, etc. – I’m going back this month. But in the meantime, back up here in the cold, I wanted to bring myself back to a bit of a warmer state of mind, and what better excuse to use everyone’s favorite winter warmer, the slow cooker?
So I decided to try a spin on a DF classic – al pastor. So I polled a couple Mexican friends (ok, exactly two) for a recipe, and combining them got a semi-coherent list of ingredients with vague proportions. But it sounded good, and I’m not big on precise measurements anyhow. Also note that al pastor is generally defined by use of the guajillo chili, which I didn’t
have handy. I used chipotle. I also had no pineapple juice, so that got mucked about a bit, and obviously I slow-cooked instead or spit-grilling.
You read the title, right?
I also added the onion because I thought it seemed right. It was.
I used:
Product:
Marinade:
Preparation is wonderfully simple: put all the ingredients in a glass or ceramic bowl, cover and marinate overnight. In the morning before leaving for work, I poured everything into my trusty slow cooker, and set it on low for 9.5 hours (its longest setting, just because it’s not like I was getting home in less than 11) . I arrived home that evening to a gorgeous aroma from the pot, now happily keeping things warm, from which I heaped lovely, fall-apart tender pork. It was truly delicious alone, but over some rice (I suspect hominy would be good too) it was really awesome.
The cooked marinade, by the way, is a keeper: this may become a go-to barbecue sauce for me: transfer it to a saucepan and let reduce. Thicken with cornstarch or flour, and toss the pork back in, you could make tacos. I’m just sayin’.
Buen provecho!
– MAW

Nadine Khalaf Aldridge is worth getting to know.
She’s a bright, charming, generous foodie who plates damned sexy food. It’s tempting to shorten this bio and let her work speak for itself, because it’s that good. “Go forth, fellow foodies, and admire her gorgeous creations on Instagram or on Facebook, or her cookbook-worthy recipes at foodienada.com. Peace out, we’re done here.”
But if you enjoy her work as much as I do, you might be curious about her personality, journey, or inspirations. I had the privilege of spending over an hour with her on the phone and came away smiling, thinking, “Gosh, I’d like to be friends with her. It’s like we’ve always known each other.” She’s engaging, genuine, down to earth, and fun. When she’s not at home making culinary magic, she’s at work as a communication and marketing analyst. Her education wasn’t in the culinary arts, though. It was in biology and chemistry in undergrad, and then French literature for her master’s.
I wondered how her degrees influenced her food blog. Perhaps her writing is better because of the French lit, but I get the feeling it’s her personal qualities that have had the biggest impact. She was born in Achrafieh, Lebanon and grew up during the civil war there. She wanted to help by becoming a soldier or a doctor, so it’s no surprise that when we fast-forward to when she started instagraming her beautiful food and her followers asked a couple times a week, “how did you make this?!”, that underlying caring quality expressed itself again: she wanted to help, so she volunteered her recipes.
She’s a giver. I love givers.

Shrimp Salad
We should thank Nadine’s parents for raising this giving, wonderful daughter, but can we credit them with inspiring her to cook, too? I think so. When her mother was bedridden, eight-year-old Nadine would make her dad salad, potatoes, and steak in a pan. Seeing his reactions made her want to learn how to be a good housewife/cook who could take care of her family. She would continue to take instruction and learn from mom.
At twelve years old, her family immigrated to Virginia, then moved to San Diego, and finally settled in the great state of Texas. Nadine’s favorite part of the state is Dallas because it’s full of national and international transplants. There’s enough diversity and academia there to keep it interesting. Did her cuisine yearn to be Texan too? After reflecting, she says no; her mom and her Lebanese upbringing were the biggest influences, along with trips to Europe and France in particular, where she refined her palate. California’s style of cooking—using tons of fresh produce—was also crucial.
Being a huge fan of Alton Brown and Jacques Pépin, I had to ask Nadine who her favorite celebrity chefs were. It turns out we both love Mr. Pépin. Also on her list are Mario Batali, Michael Symon who’s very talented, Ina Garten who never went to culinary school, and Joël Robuchon, who’s an amazing French chef. When asked “why Joël?”, Nadine’s reply: “I would love to eat at one of his restaurants. His mashed potato is equal parts butter and potato; you just want to swim in it!” Her favorite kind of cooking show is one where they’re cooking something complex or difficult, not just peeling carrots. I apologize to all the expert carrot peelers for our lack of appreciation of your skills. There’s irony here, because—and I’m blushing/giggling/shaking-my-head as I admit this—I actually enjoy peeling carrots quickly and perfectly, with minimal waste.
At this point, we’re beginning to understand Nadine, the person: what she values; what she likes. What about the story behind the blog? How did she go from posting photos on Instagram to having an elegant presentation of the underlying recipes? At first, with around 15 followers, it wasn’t hard to share recipes. As the number grew (today at over 2000), more people asked for them and retyping became difficult. It was also hard to share when she’d never really measured the ingredients. The natural next step was: be deliberate about documenting the recipe (and measuring!) and centralize the result in a blog. But she didn’t stop there.

Breakfast

Roasted Potatoes

Cheese Tarts
She did extensive research about blogs and about photography. Hints like, “take photos in natural sunlight,” and details about blog layout and how to best convey her passion. And that’s what it became: a passion. In her words, “sharing something I love with someone else, whether I know them or not.” But it’s still more than that. Eventually, when she has hundreds of recipes, she’d like to leave it to her daughter as a keepsake. May the d’awwing commence. She reminded me of Randy Pausch’s Last Lecture which is similarly inspiring.
After hearing about all this cooking and blogging, my thoughts went to the only place they could go: who eats all that gorgeous food?
Most of the posts are made for brunches of about 10-12 people. A small number are for occasional things like Father’s Day or her husband’s birthday and about a third are done on the weekends, when she cooks for her family and has time for the extra effort of measuring.
She has a few go-to ingredients, starting with the simplest (yet one of the hardest to measure, because it gets added gradually): salt. She uses extra virgin olive oil for pretty much everything (even Tex-Mex!), lemon juice/zest, fresh herbs as often as possible, and organic tomato paste, which is one of the few things she’ll buy jarred. Her absolute favorite ingredient to use on potatoes or French fries is Piment d’Espelette. It’s like a sweet pepper, but a little spicy. Mostly delicate. I can’t wait to try it.
 One of her favorite things to make is flank steak. I’m drooling at her photo even though I’ve never tasted her cooking because her plating is so exceptional. She can’t possibly cook all these amazing things for every meal though, right? So I asked her what she cooks most often, day-to-day. “It’s a lot more Lebanese food than anything else. More Mediterranean. Tabbouleh maybe 3-4 times a week, hummus a few times a week, salads for dinner, lots of stews.” On the weekends is when she goes all out. And this is a working mom, remember. Respect.
I had to put my admiration aside to ask what she’s planning for the future. In the short term, she wants to learn more about how to make the blog look better. She’s not ashamed of the work she’s done—she did it all herself—but, for example, she wishes she’d taken photos in better lighting. She might want to learn more about the technical details of blogging, including HTML/CSS, how to market it, and this whole “trendy social media thing” (my words, not hers). Longer term, she dreams of going to a farmer’s market, making something, inviting friends or strangers over for taste testing, then writing cookbooks. Maybe full time. Maybe sneak off to culinary school too. How cool would that be?! I kind of want to ask Gordon Ramsay for help. Let’s make an episode with Nadine for one of his shows and dedicate it to plating. Best food porn wins.
I feel fortunate to have met Nadine. She invited me to dine with her someday, and I look forward to that day gleefully (flank steak, I’m looking at you). My only regret about this interview is that I didn’t ask her husband for any juicy tidbits that she “forgot” to mention. Like maybe a secret love of eating plain mayonnaise out of the jar at 3AM while watching Married With Children reruns. There’s still time. I’ll call him as soon as I can. In the meantime, I hope you enjoyed reading about Nadine as much as I enjoyed interviewing her.
—Mark Feghali (MFF)
