• 21Oct

    photo 1
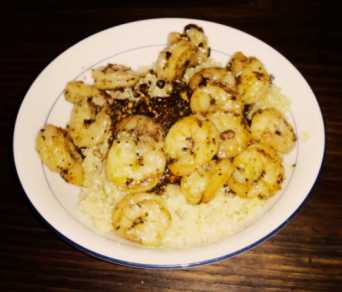
Enchiladas are one of my top 5 most craved meals. If I go to a Mexican restaurant, I inevitably find my way to the enchilada section of the menu and usually get a combo of beef and cheese enchiladas, always with red sauce. I also make them at home frequently. I love their melted cheesiness, the soft corn tortillas filled with beef, the flavorful red sauce… from a can! Other than beans and tomatoes, I’m not big on canned food.

    So, the other day, as much as I’ll happily, and without shame, admit to photo 2
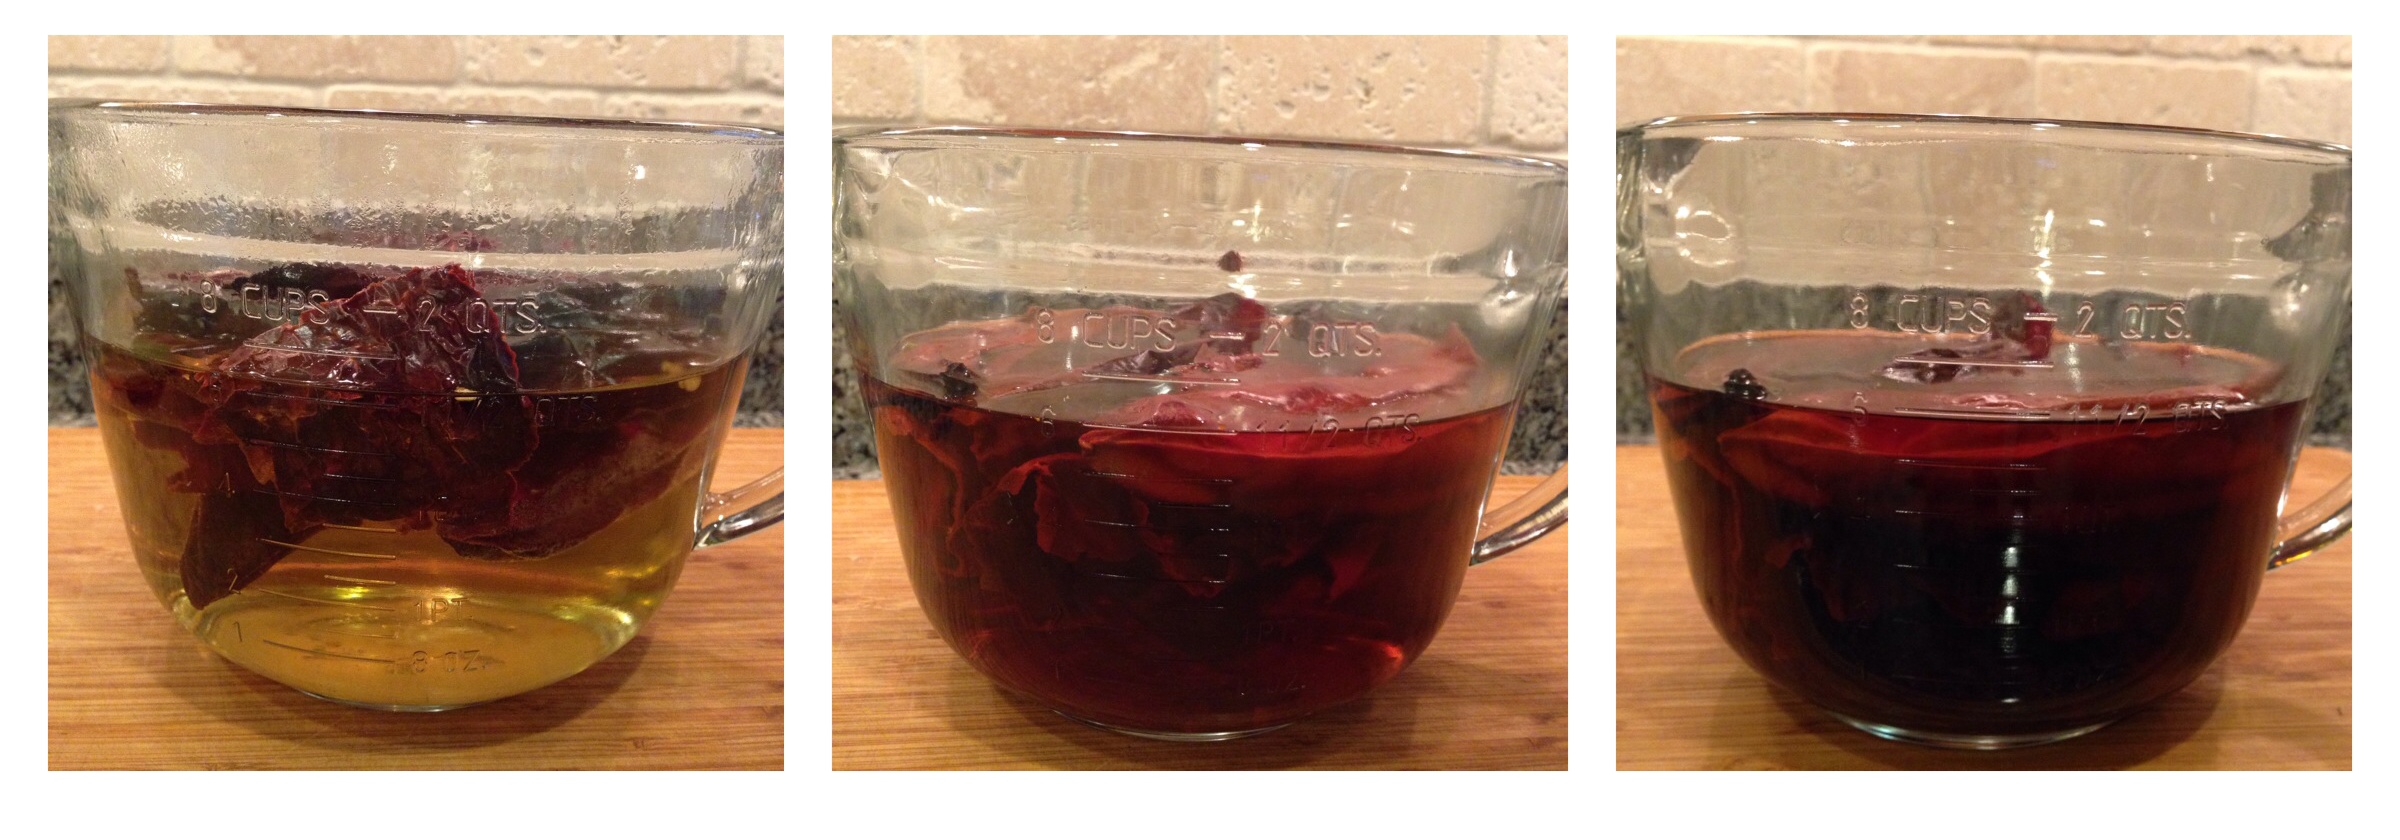
loving the canned sauce, I began to wonder… “How do they make that?!” So I started to google. I am by no means an authority on authentic Mexican food, but my taste buds don’t lie to me very often. Do you know how many “authentic Mexican enchilada sauces” used tomatoes as their base? dozens! Even I know that’s not how it’s made. I knew the sauce was based on dried chiles, but that’s about all I knew.

    photo 3So I researched (obsessively) and found two recipes that sounded very authentic, and had no tomatoes or flour on their ingredient lists. One was based on a recipe from Rick Bayless’ cookbook, and if you’ve never heard of him, he’s like the ultimate rock star chef when it comes to authentic Mexican cuisine. Another was from mexicoinmykitchen.com. I took my favorite elements from both and combined them with a few other things I learned on my googling adventure, and came up with this. It was so fun and satisfying to create something from scratch that I have loved for so long! And it was really inexpensive and easy. The best part was that my house smelled like a Mexican restaurant, which I took as a sign I was doing something right! Here’s how I did it.

    Mild Red Enchilada Sauce

    Ingredients:

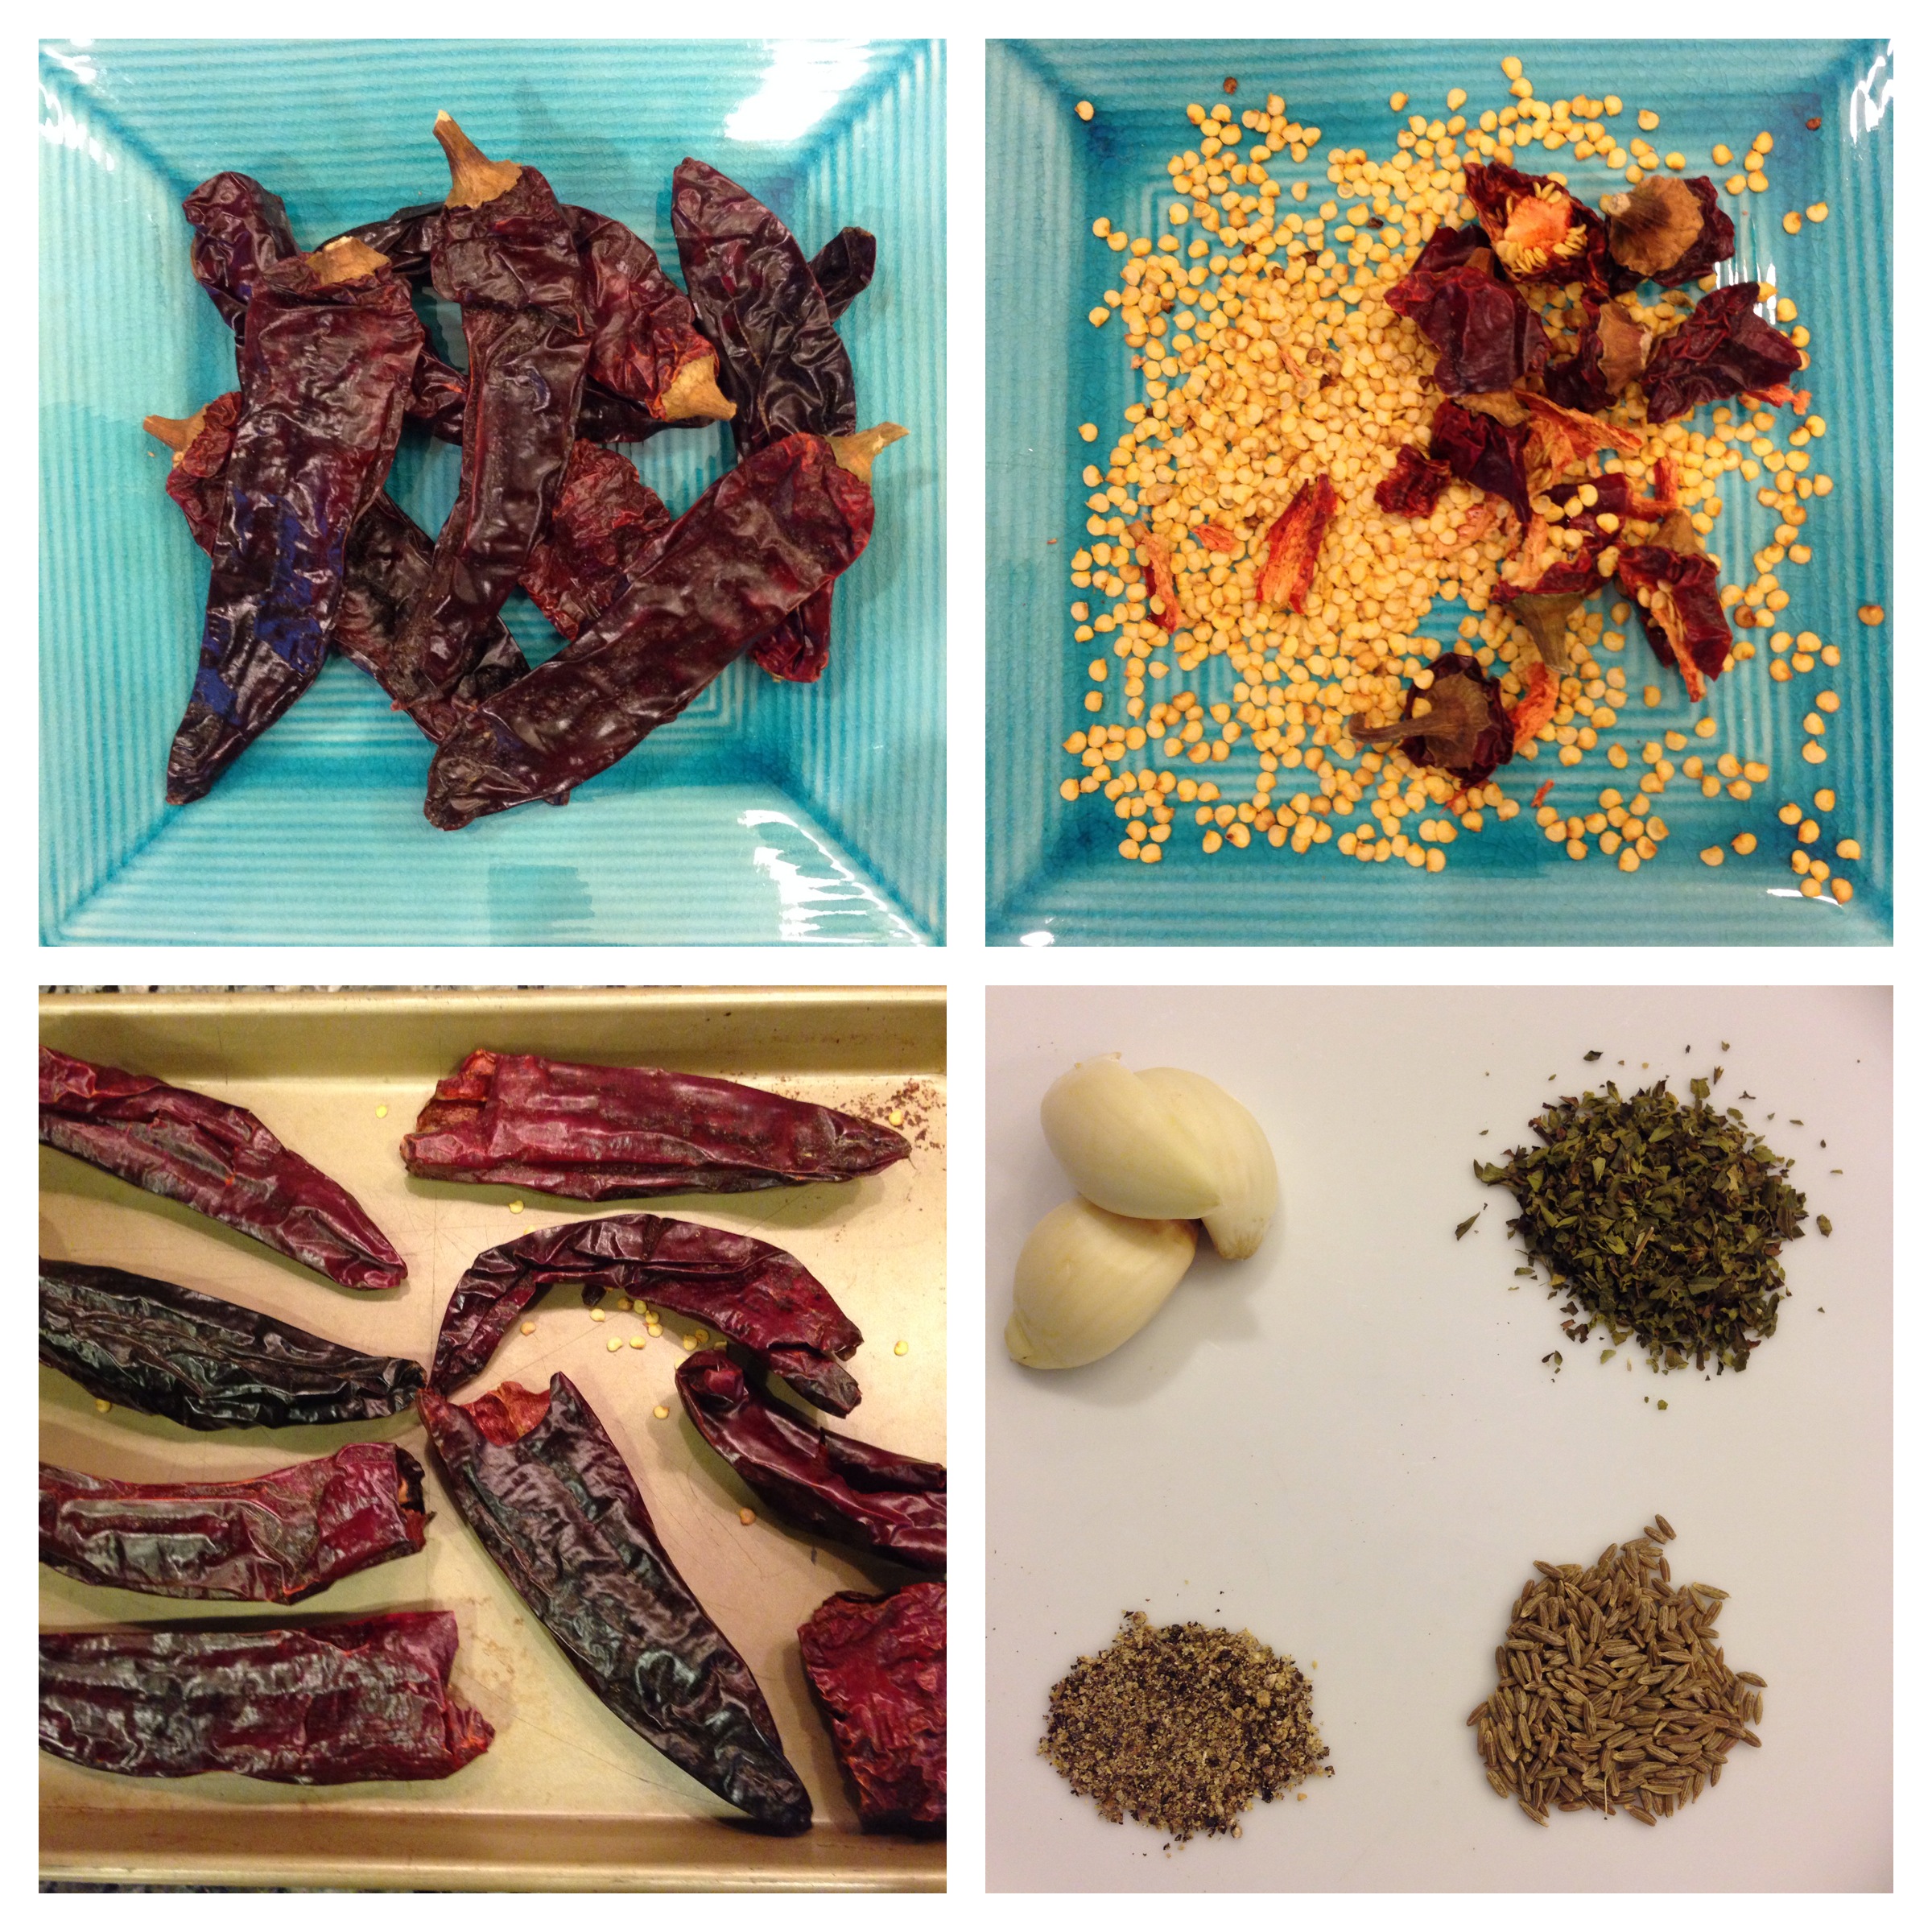
    • 8 dried ancho chiles (also called California chiles)
    • 3 whole garlic cloves
    • 1 tbs salt
    • 1 tbs sugar
    • 2 tsp black pepper
    • 2 tsp dried oregano
    • 1 tbs cumin seeds (or ground cumin)
    • tiny pinch of ground clove (traditional, but optional)
    • 2 tbs white vinegar
    • 2 cups chicken broth
    • 2 cups soaking liquid
    • 3 tbs vegetable oil

    To Prepare:

    Preheat oven to 400. Set a tea kettle or small pot of water to boil. Prepare chile peppers by tearing or snipping of stems and shaking out as many seeds as you can. Place peppers on baking sheet and toast in preheated oven for 5 minutes. Place peppers in a large heat proof container and pour over boiling water to cover. Let them steep for 1-2 hours. The water will become a deep red color and the peppers will become very soft.

    Place peppers, two cups of soaking liquid, garlic and spices in a blender and puree until completely smooth. Heat oil in saucepan and add the pureed mixture, vinegar, and chicken stock and cook over medium-high heat until the sauce reduces and slightly thickens.

    Use in your favorite enchilada recipe and enjoy!

    Note: For a vegetarian version of this, either use vegetable stock, or just use 4 cups total of the soaking liquid and omit the stock all together.

    -ALH (Ani)

  • 16Oct

    Goat StewI’m furloughed. That means I’ve had time to explore recipes that take way longer than my usual 30-minutes-and-done dinner routine, and also to use ingredients I don’t really have any idea how to address. I saw bags of trigo mote verde (peeled green wheat) at the Latin grocery I’d been meaning to check out for some time, and bought it on a whim. When I saw the goat tidbits were on sale, an idea began to form. When I started to ponder what to cook, I noticed that the goat was not … the highest quality … and was going to need major work to taste good. I’m not one to waste food if I can avoid it, so I decided that some spice-fu should do the trick.

    So, inspired by the Spanish labeling on the wheat, I decided to take a Latin direction (heavily informed by my own Caribbean leanings with respect to goat). I started with sofrito:

    • 1 large yellow onion, diced
    • 2 yellow bell peppers, diced
    • 1 head of garlic
    • 2 habanero (scotch bonnet) peppers, finely diced
    • 1 tsp dried cilantro
    • 1 tsp dried basil
    • 1 tbs sesame oil
    • 2 14.5oz cans of diced tomatoes, one drained

    And added the other ingredients along the way:

    • 2 pounds goat meat (boneless, chopped into 1 inch cubes)
    • 1 bag of trigo mote verde (peeled green wheat)
    • About 5 tsp fresh grated ginger
    • A handful of allspice berries
    • 1 tsp each cumin, turmeric, and cinnamon
    • 1 tsp sea salt
    • 4 cups water
    • 1/2 cup white wine vinegar
    • 1 pound okra (washed, but NOT CUT*)

    I browned the goat briefly in a large dutch oven, then set it aside.

    Next, I added all the sofrito ingredients except the tomato, and tossed over medium heat for about 5 minutes, until fragrant. Then I added the tomatoes and re-added the goat.

    Once well mixed, I added 3 cups water, trigo mote verde, allspice, cumin, turmeric, cinnamon, and salt, and brought it all to a boil. Once boiling, I reduced the heat to simmer and covered the pot, leaving open to let some steam escape. Stirring occasionally, and sometimes tasting to adjust flavor, I let that cook about 30 minutes.

    At this point I added the ginger, vinegar (I didn’t want to cook away all that sharpness), and a bit more water, and re-covered for another 15 minutes or so. At that point, things were looking close to done, so I added the okra and did some final salt/pepper adjustments.

    Another 10-15 minutes saw the okra where I wanted them, nice and al dente as a textural contrast, so I turned off the heat and served my stew. Delicious, with the heat and spice and vinegar pushing the very earthy goat into a lovely flavor profile, and the long cooking keeping it nice and tender.

    This recipe makes what I’d call about 10 servings, so I’ve been taking fun ways to use the leftovers too. My favorite so far: wrapped, dolma-style, in collard greens blanched in lemon juice. Enjoy!!

      – MAW


    * Oxygen is what makes okra get all slimy. If you don’t cut it before cooking, the texture is much nicer.

  • 09Oct

    Being furloughed and not really having much in particular to do (but needing to save money!), I’ve been experimenting with African cuisine, particularly soups and stews, and even more particularly rekindling my love of (a) couscous and (b) fufu.

    What follows is my favorite concoction so far, a hybrid recipe using ideas from a few places – mostly from The African Food Joint, Serious Eats, and Leslie Cerier. Being me I couldn’t be bothered to follow any of the recipes exactly, but the result was sufficiently delicious (if not all that authentic), to make it very worth sharing.

    Vegetable StewI used:

    •  2 cups cherry tomatoes
    • 1 medium yellow onion, chopped
    • 1 Scotch bonnet Pepper, seeded and minced
    • 1 large Yam (the purple kind with white flesh), cubed
    • ½ cup raisins
    • 1 can Garbanzo Beans
    • 4 cups kale, chopped
    • 6 small garlic cloves, finely diced
    • 1 Cinnamon stick
    • 1 tablespoon Sesame oil
    • 4 cups Chicken Stock
    • Salt, pepper, cayenne to taste

    What I did:

    •  In a large pot (I used an aluminum stock pot), add the tomatoes, onion, 3 cloves of garlic, and Scotch bonnet and toss with the oil over high heat, just until it starts to get fragrant.
    •  Add 1 cup of stock and bring to a boil for about 2 minutes, then blend using your hand blender.
    •  Add your remaining stock and bring back to a boil, adding your yams and cinnamon stick. Boil on high heat for about 5 minutes. Now lower heat to simmer, cover the pot, and leave for about 15 minutes.
    •  Next, add your chickpeas, up the heat to medium, and taste/adjust heat level using cayenne. Stir in your kale and remaining garlic, cooking a few minutes till the kale is done.
    •  Season with salt, black pepper, and more cayenne if needed.

    The first night I made this, I made fufu as described in the African Food Joint recipe, except I made quenelles out of it which I then fried in butter, because I just got back from France, but it goes well with the more traditional fufu, and couscous too. If I were going to adjust this recipe next time, I’d again call out to my French culinary habits and add in some cream in the second step (the blending), and maybe use a second Scotch bonnet as opposed to extra cayenne. That said, I’m going to happily keep eating this batch till it’s gone!

     – MAW

  • 04Oct

    Tomatos afterGrowing up in Virginia, with its beautifully changing seasons and abundance of local produce, I have developed certain food craving patterns. Tomatoes are at the top of my seasonal cravings list. For most of fall and all of winter, I dream of perfectly ripe tomatoes just picked and still warm from the sun. As soon as the last frost thaws, I can’t wait to get my hands dirty and plant some. And every spring, without fail, I develop amnesia and decide that it’s a great idea to plant way too many tomato plants. My crazy, tomato-deprived side says, “Why plant just one??!” and my logical side falls for it every time.

    Roasted tomatoes finished productSo, at some point during the summer I have tomatoes of all different shapes and sizes coming out of my ears. While I would never consider this a problem, it is certainly a situation that needs to be dealt with. I do the obvious and toss them in salads, add them to sandwiches (BLTs anyone?), throw them into various pasta dishes, and frequently make my son’s favorite: Caprese salad. But I also try to come up with new, creative recipes of my own. I made a fantastic rustic tomato soup a few summers ago… of course I’ve made marinara sauce and fresh salsa… but my favorite creation came to me this summer when, after a few days of being ignored, my roma and cherry tomato plants were bursting with ripe fruit. I stood staring at my tomato-covered counter top, waiting for inspiration to strike… and boy did it. I’m still patting myself on the back.

    CrostiniWith sun-dried tomatoes in mind, I created something even better. I thought about calling them “oven dried” but they aren’t dry at all. So, I settled on “slow roasted” and never looked back.

    Now, obviously I used fresh summertime tomatoes, but this would be a great way to transform the less than desirable supermarket tomatoes we are forced to buy in the fall and winter—something I am definitely planning on doing, and I hope you will too.

    Slow Roasted Tomatoes

    Ingredients: 

    • Lots of smaller tomatoes such as roma, cherry, or grape, halved-about 8 cups (they shrink after roasting)
    • 1/4 cup Olive oil
    • salt and pepper
    • pinch or two of red pepper flakes to taste
    • fresh herbs, oregano and thyme are my favorites
    • 4 garlic cloves, peeled and very thinly sliced

    To prepare: 

    Preheat oven to 250 degrees.

    Place all ingredients in a large mixing bowl. Toss gently to coat the tomatoes and spread the entire mixture evenly on a large rimmed baking sheet(s). You want an even layer with no overlapping.

    Roast for 2-6 hours, gently tossing occasionally (or just shake and rotate the pan). The time is broad, I know, but it depends on the juiciness and size of your tomatoes and your oven. The tomatoes will shrink and their juices will dry slightly. Don’t take them too far; you want them to still have some juiciness. This really needs to be judged by eye, so just check on them occasionally.

    Enjoy straight from the oven, or transfer, along with all juices and herbs, to a mason jar or other storage container, cover with more olive oil and store in refrigerator.

    Note-The olive oil will harden upon refrigeration. Allow refrigerated tomatoes to sit at room temperature for 30-40 minutes before using.

    Serving suggestion (and THE reason to make these tomatoes…)

    Roasted Tomato and Goat Cheese Crostini 

    Ingredients:

    • Baguette, or any good bread, sliced 1/4 inch thick on an angle
    • Oven roasted tomatoes
    • Fresh goat cheese
    • Fresh basil

    To prepare:

    Drizzle or brush bread slices lightly with olive oil, and either toast in a 350 degree oven 10-15 minutes, or gently toast in a grill pan or skillet until lightly golden on both sides, but still tender in the middle. Transfer to a platter and smear with a tablespoon or two of goat cheese, top with oven roasted tomatoes, and sprinkle with fresh chopped basil. Enjoy!

    -ALH

  • 03Oct

    Cheap Chicken beforeLately, it seems everyone is hunting for inexpensive meal options, myself included. Yes, I know I spend way too much money at the grocery store. Mainly because I can’t walk past the cheese oasis at Wegman’s without pressing my nose against the glass, and eventually asking for a taste of something. They are always so friendly and eager to please, and I inevitably end up walking away in a daze with three cheeses from three different countries wondering what just happened. It’s a problem. I know.

    Cheap Chicken afterI’d like to think I justify these impulse expenses by cooking the way my dad taught me, which turns out to be quite budget friendly. He made roasted chicken in some form or another at least once a week when I was growing up. Roasted chicken is a timeless classic, not just because it’s comforting, reliable, and delicious but it happens to be CHEAP. It’s a shame that in this boneless/skinless chicken breast obsessed world we live in, shoppers blindly walk past one of the best bargains in the store: chicken leg quarters.

    Don’t get me wrong, boneless skinless breasts serve their purpose, and I have some in my freezer right now. They are quick and convenient and I use them often, but they simply do not, cannot, and will never satisfy my roasted, crispy-skinned chicken cravings.

    Ok, back to the chicken leg quarters. I buy a bunch of them and freeze them separately in quart sized bags. This just makes the defrosting process much easier, and if you only need one or two, you don’t have to wrestle with an entire iceberg of chicken. Which I have done. It wasn’t pretty; I don’t recommend it.

    Thighs happen to be my very favorite chicken piece, and dark meat goes over well in my house. My son prefers white meat, but I am slowly luring him to the dark side, using crispy chicken skin as bait, which this recipe definitely delivers. You would have to try pretty hard to overcook legs and thighs; they just keep getting better as you baste them in their own juices. The result of this cooking method is perfectly crisped skin with still juicy meat underneath. Perfect.

    Note: The lemon pepper is my Grandmother’s influence. She always puts it on chicken, and I love it, but you can really spice these up any way you like. Chili powder, your favorite spice blend… get creative. Or just use plain salt and pepper as I do often. They’ll be great no matter what you choose. Here’s how to make them:

    Roasted Chicken Quarters

    • 4 chicken leg quarters
    • Salt and freshly ground pepper
    • Lemon & pepper seasoning blend (I like McCormick)
    • 1-2 lemons sliced into wedges (optional)
    • Chili Powder (optional, I use Morton & Basset‘s chili powder)
    • Fresh chopped parsley as a garnish (optional)

    Preheat oven to 375 degrees

    Place your chicken pieces in a baking dish that holds them comfortably, a little snug is fine as long as the skin gets full exposure. They shrink a little as they roast. Apply your seasonings of choice on both sides of the chicken. Roast, skin side up, basting every 20 minutes or so, until the skin is bronzed and beautiful, and the chicken reaches an internal temp of 165, or the juices run clear. This should take 1 1/2 to 2 hours. Let rest a few minutes before serving. If using the roasted lemons, squeeze over the chicken just before serving.

    To complete the meal, serve the chicken with simple white rice to soak up the juices, and peas. This was my favorite childhood combination, and it’s never gotten old. Enjoy!

    -ALH (Ani)

  • 30Sep

    Once upon a beautiful evening in Warrenton, VA, after finishing a lovely, leisurely rooftop meal at Iron Bridge Wine Company four friends ordered dessert…

    Crème brûlée was the unanimous choice, and Iron Bridge has a great one… It has chocolate ganache on the bottom and, purist though I am, I can’t resist it. While enjoying our delicious desserts under the stars, we discovered an uninvited dinner guest. A very nosy praying mantis appeared on the strand of lights next to our table and seemed very interested in our creamy desserts. We all had a good laugh and, although nobody was willing to share with him, he hung around for the rest of our meal, entertaining us with his very interesting dance moves. We still laugh about it and I’m quite certain I’m the only woman who thinks of a praying mantis every time she makes or eats crème brûlée.

    Crème brûlée is one of those desserts that I think everyone loves (insects included). The funny thing is, most people think it’s terribly complicated and fancy. This is sneaky, sexy French simplicity at its finest—4 ingredients composed in a way that mystifies people while simultaneously knocking their socks off. It makes people wonder why it’s served in such tiny vessels as they scrape the final bits out with their spoon and look around wondering if anyone will notice them licking their ramekin.

    I keep mine simple and classic, and haven’t gotten any complaints. If you would like to make this dessert in the hopefully praying mantis-free comfort of your own home, here’s how:

    Special equipment:

    • 6 4-ounce ramekins (Although I have made this in small coffee mugs and very small mason jars before–When the urge for crème brûlée strikes, nothing can stop me.)
    • small kitchen torch

    Ingredients:

    • 1 vanilla bean split lengthwise, or 2 tablespoons pure vanilla extract
    • 2 cups heavy cream
    • 4 egg yolks
    • 1/4 cup granulated sugar
    • pinch of salt

    For the crunchy top:

    • a few tablespoons granulated sugar

    Heat oven to 325 degrees and boil a tea kettle or a small saucepan of water.

    Place the ramekins in a baking dish large enough to hold them comfortably and set aside.

    Add the heavy cream and split vanilla bean (or extract) to a small saucepan over medium-high heat. You want the cream to get hot, but not boil, so keep an eye on it, and if you see bubbles around the edge, turn off the heat.

    While waiting for the cream to heat, whisk the yolks, sugar, and a pinch of salt in a large mixing bowl until the mixture thickens and becomes pale yellow. When you lift your whisk a long ribbon should fall. (You can use a mixer, but I always feel like a very fancy French pastry chef when I do it by hand. Plus, it really isn’t worth dirtying a mixer.)

    When both your cream mixture and yolk mixtures are ready, slowly add the cream mixture to the yolks while whisking.

    Just as a curdle precaution I then pour this mixture through a fine mesh sieve set over a large measuring cup. (the measuring cup helps with the pouring process.)

    Next, divide the mixture evenly between the ramekins. Place your baking dish in the oven, and very carefully add the recently boiled water to the pan, making sure not to get any in the ramekins. Loosely cover the entire dish with foil and bake for 30-40 minutes. When you gently shake the ramekins they will be very loose and wiggly still, but set. They will firm up after refrigeration.

    Remove the ramekins from the water bath and let cool to room temp, or if you’re impatient like me, just stick them in the fridge as soon as they come out. Let chill for 3-4 hours (at this point you can let them sit in the fridge covered for 3 days before moving on to the next step)

    5-10 minutes before serving, sprinkle each ramekin with a light dusting of sugar. I like a very delicate layer of crispy sugar, but if you like it thicker, just add more sugar. Holding your kitchen torch close to the surface of the crème brûlée move slowly and constantly back and forth until the sugar bubbles and turns a caramel color. The sugar will harden within seconds. Enjoy!

    -ALH

  • 26Sep

    Carbonara 1Tuesday: I left my house at 7 am, had classes all day, a granola bar for lunch, raced off campus at 2:45 to make it to my daughter’s gymnastics class and blew in the door at 5:30 with my two hungry kids. I did not plan ahead for dinner; there was nothing happily simmering away in a crock pot on my counter.

    My answer, as it so often is, was pasta. But not just any pasta… My dad’s pasta carbonara (with a few of my small tweaks). I grew up eating it, it’s not fancy, it’s not quite traditional Italian–although pretty darn close. (Please excuse me for not stopping at Wegmans to buy cured pig cheeks.)

    Anyhow, in the time it takes to boil the pasta, I can  assemble the rest of the ingredients. It all gets tossed together and served. It really is that simple. This dish proves that comfort food doesn’t have to take all day, and that busy people don’t have to resort to take out, frozen food, or sauce from a jar. My son refers to it as “that creamy bacon pasta thing” and my daughter just likes anything involving noodles and/or bacon. It is a less than 30 minute meal that satisfies deeply and I can almost guarantee most people have the few ingredients it requires in their kitchens right now. And who doesn’t love the smell of bacon at the end of a long, crazy day?

    Cook’s note: Before getting started I recommend pouring yourself a cold glass of Italian Pinot Grigio. It helps make the experience more authentic… That’s my story and I’m stickin’ to it.

    Ingredients:

    • 1 lb of any long slurping noodle such as spaghetti or linguine fini
    • 8 ounces bacon (thicker cut the better) cut into small strips
    • 1/2 yellow onion very finely diced
    • 1 or 2 garlic cloves smashed
    • 4 egg yolks (place in a medium sized mixing bowl)
    • 1 1/2 cups parmigiano and/or finely grated Romano
    • 1 cup of reserved pasta cooking water
    • Freshly ground black pepper
    • handful of chopped parsley (optional)

    Instructions:Carbonara 1

    Bring a large pot of water to a boil

    Once boiling salt generously and cook your pasta according to the package directions.

    While waiting for the water to boil, begin crisping the bacon in a large skillet over medium heat stirring occasionally.

    When bacon is crisp, remove to paper towel lined plate to drain and pour off excess bacon drippings, leaving about 2 tablespoons in the pan along with any brown bits.

    Return pan to heat and add onions and garlic, cook until softened, but not brown-about 5 minutes.

    turn heat off and leave onion/garlic mixture to cool slightly.

    Meanwhile:

    When your pasta is almost cooked, scoop out a cup of the water, and very, very, VERY slowly drizzle the hot water into the egg yolks while whisking constantly. If you pour the hot water in too quickly, or without whisking, you will have scrambled eggs.

    When your pasta is cooked, drain it in a colander or scoop directly from pot to pan with tongs, and add it to the skillet containing the onions and garlic, and grind in as much black pepper as you can stand; I like about 20 grinds from my pepper mill. (They don’t call it coal miner’s pasta for nothing; the black flecks are said to resemble flecks of coal.) Quickly add the egg mixture, cheeses, bacon, and parsley if using and toss immediately with tongs until the mixture clings to the noodles and becomes silky. At this point the hot pasta will cook the eggs, but not curdle them, so it is very important to add the egg mixture to the noodles as soon as they come out of the water. Let this sit briefly, one or two minutes, and stir once again before serving.

    -ALH (Ani)

  • 19Aug

    I’m on a protein kick – I’ve been going for over 100g/day which, unless you’re willing to suffer masses of artificially-flavored shakes and supplements, can be a challenge. I also avoid processed foods, so I have learned to be pretty handy with shrimp and quinoa. This is one of my favorites.

    Gambas!You’ll need:

    • About 20 shrimp
    • 3 cloves of garlic, diced.
    • A mix of about 2.5 tablespoons of fresh ground black pepper with about 1/2 tablespoon salt. Grind in a few sichuan peppercorns too for a nice extra somethin’-somethin’.
    • 1/4 cup lemon juice
    • Olive Oil
    • Quinoa

    I use frozen cleaned shrimp because I’m lazy. Fresh would make this even more awesome.

    So, get your quinoa cooking as you do. While that cooks, saute your garlic in olive oil. Toss in the shrimp (at room temperature), and stir in about half of the pepper/salt mix. Cook over medium heat for about 5 minutes, or until the shrimp are almost done. At that point, stir in the rest of the salt and pepper.

    When the shrimp are fully cooked, remove them to your serving dish and deglaze the pan with some more oil and the lemon juice. When it’s reduced halfway, and you’ve got all the good charred pepper and garlic crust re-emulsified into a sauce, pour that directly over the shrimp and quinoa. A parsley garnish is a nice touch if you’re feeling fancy.

    And here’s your dinner – bloody good, pretty quick, and full of protein!

    -MAW

  • 11Jun

    The bad news: it’s probably not already in your pantry. The good news: once you buy it, you’ll use it in everything. Despite this somewhat hefty one-time cost, Suneeta Vaswani’s Easy Indian Cooking: Second Edition offers up some delicious, and (usually) simple recipes for international cuisine aficionados and newbies alike.

    It gives home chefs a medley of options, including “Chaat and Street Foods,” “Snacks and Appetizers,” “Rice Cereal and Breads,” “Beans and Lentils,” “Poultry and Meat,” “Fish and Seafood,” “Vegetables,” and “Sweets and Beverages.” This variety of dishes, alongside personal anecdotes and stories from the author with each recipe, helps to give readers a more full experience. With an introduction detailing the history, significance, and current trends in Indian cuisine, this cookbook is modern, fun, and authentic.

    Another helpful feature, Vaswani provides a list of common Indian ingredients, spices, spice blends, herbs, and general guidelines that apply to most of the dishes. These are particularly useful when making that initial trip to the grocery store, which, if you are a fan of Indian-style cooking, will certainly be worth it. Further, with the addition of helpful tips and pointers accompanying the slightly more difficult recipes, this cookbook really tailors to the cook who has had little experience with Indian cuisine in the past. The only downside: many of the spices, such as asafetida (hing), carom (ajwain), and mango powder (amchur), can be rather difficult to locate at your local grocery, and may require a separate trip to a specialized supply store. With the possibility of none of the sort near by, this may mean skipping a few recipes, or doing some research to track down your ingredients.

    A personal favorite from the book, the “Yellow Lentil Soup with Vegetables,” is a flawless example of the easy, and relatively quick, Indian cooking that the book advertises. All the ingredients are inexpensive (again, apart from the initial purchase of the spices that go into it, including the classics turmeric, cayenne pepper, and cumin seeds) and easy to come by. Loaded with tomatoes, potatoes, carrots, and green beans, and made rich by the paste of blended cooked lentils, a traditional ingredient in Indian cooking called “dal,” this soup is certainly as “soul-satisfying” as Vaswani promises. And, with only six steps, this recipe made my first experience with Indian food a success.

    The meat, poultry, and seafood dishes tend to be a little more demanding, yet not undoable by any means.   The “Golden Shrimp with Cilantro and Lime,” with only eight ingredients (all of which, excluding the frozen shrimp I had used in other recipes), and four steps, was an exceptionally simple and delicious seafood dish. Vaswani recommends serving it as an appetizer, as part of a buffet, or over greens as an entrée. However, with its bold, fresh, and light flavors, this dish is so versatile that I could also imagine it adorning a bed of rice or warm naan bread.

    Apart from these very traditionally Indian recipes, the cookbook also provided some dishes that are somewhat unexpected. For example, the “Indian Scrambled Eggs,” or “akori,” are a unique marriage of Indian cuisine and Americana. They provide familiarity for those more hesitant to jump right into the bold spices of other recipes. With a mix of onion, garlic, tomato, green peppers, turmeric, cayenne pepper, and cumin, these eggs have all the flavors of Indian cooking while remaining understated and unintimidating for nervous palates. Another perfect recipe for this individual: the “Indian Macaroni and Cheese.”

    For those hoping to satisfy their love of international cuisine, or simply looking to try something new, Easy Indian Cooking: Second Edition is a great place to start. Although it could include more pictures, and some recipes have a rather lengthy list of ingredients with unfamiliar procedures and spices, this cookbook is nevertheless perfect for taste buds begging for something outside the norm. With only a minimal amount of effort, cooks can watch these beautiful dishes come to life and fill the kitchen with their enticing aromas. So, why not try Indian tonight?

    -Paige (EPC)

  • 04Jun

    200-Best-Ice-Pop-RecipesI tried out a few recipes from 200 Best Ice Pop Recipes by Andrew Chase:

    1. Pineapple Sage Ice Pops contain water, granulated (white) sugar, fresh sage leaves, salt, and a pineapple. You make a simple syrup with the water, sugar, and sage on the stove top and then add to to the pineapple which you puree in a blender. I had a very sweet pineapple on hand, so reduced the amount of granulated sugar in this recipe. These pops were delicious, The sage added an earthy herbal flavor to the pops without overpowering the pineapple. I will make them again.
    2. Strawberry Lime Ice Pops contain dark brown sugar (I used light brown sugar), lime zest and juice, and strawberries. I used fresh strawberries that were purchased as seconds from the Kingstowne Farmer’s Market stand that covers the individual containers with red protective nets. (The stand in question is the last one on the right if you walk towards the popcorn vendor.) These pops were tart, sweet, and extremely tasty, and I will make them again.
    3. Watermelon Punch Ice Pops contain seedless watermelon, grenadine syrup, and lemon juice. These pops were supposed to be the last recipe I made from this book but I did not like how they turned out, and decided to give the book another chance. The grenadine syrup separated from the watermelon, and the pops did not taste good regardless. More lemon juice might have helped, if the grenadine syrup and watermelon had not separated. I followed this recipe precisely.
    4. Sweet Screwdriver Ice Pops contain granulated (white) sugar, water, orange zest, orange juice, vodka, and orange liqueur. I tried this recipe figuring that regardless of it containing alcohol (which could affect the freezing process) that it was going to come out well. Turns out that even though I followed the recipe precisely, the pops did not completely freeze (a major problem). The pops did taste good but were soft and crumbly.

    This book has some interesting recipes, and includes the following sections: Read the rest of this entry »

Categories

Archives